Am I Testing the Right Way?
Two unit-testing approaches explained!
Pick any topic around testing and there will be at least two very contrary approaches that seem to be at odds.
One of the many points of discussion around unit testing, and in particular TDD, are the question around what good boundaries for tests are.
So the question is: Should you unit test each method on your classes or should you only unit test the public interfaces of a given feature or component?
Specifically: What can or should be considered the right size of a unit with regard to what is to be tested in isolation.
What is a Unit?
A Unit could be a method, a class or even a cohesive group of classes, that together compose a feature, as a unit.
[…] Object-oriented design tends to treat a class as the unit, procedural or functional approaches might consider a single function as a unit. But really it’s a situational thing - the team decides what makes sense to be a unit for the purposes of their understanding of the system and its testing. Although I start with the notion of the unit being a class, I often take a bunch of closely related classes and treat them as a single unit. Rarely I might take a subset of methods in a class as a unit. However you define it doesn’t really matter. https://martinfowler.com/bliki/UnitTest.html
Another question is, if there is a distinction to be made between collaborators that are external to a given unit and internal dependencies between classes.
Other sources around this topic may provide definitions and names for these different abstraction levels of testing, i.e. integration or component tests
This makes sense in some context to make a specific approach more catchable, but for this article we put all these concepts under the broad topic of unit tests.
Although everything we discuss here makes sense particularly in the context of TDD, for this article, we solely focus on how to define unit boundaries for tests rather than discussing TDD as an approach.
Unit testing, two extremes!
We present two approaches for defining units and illustrate how these approaches to testing differ based on where we place boundaries for testing.
At the end we discuss the pros and cons of both approaches.
We will refer to these approaches of defining units as fine and coarse grained, concepts that will become clear in a moment.
The fine grained approach focuses more on the implementation of the classes created to provide some behaviour, e.g. a specific feature.
It follows a pattern of testing all, even internal, components individually and then verifying that their combination follows the correct interaction pattern to provide the targeted behaviour.
In this approach there is more use of test doubles as in the coarser grained approach and some parallels can be drawn to the mockist or London school style of TDD and Martin Fowler’s definition of solitary unit tests.
In the coarse grained approach we consider a cluster of cohesive objects/classes a unit.
These objects can represent a component or a specific behaviour of the system.
A unit is tested via its public interface, only external collaborators (e.g. a repository to access a database) are replaced with test doubles.
There are some parallels in this approach to the classic or Detroit (sometimes also Chicago) school style of TDD and Martin Fowlers definition of sociable unit tests.
It is important to keep in mind, that both represent valid approaches to slicing units in order to test a component.
Central to testing is to validate the behaviour of the system under test.
Ideally starting with the test and then building the matching behaviour, either as a design or validation methodology.
Both approaches we describe here follow a different approach to achieving that and are applied at different levels of granularity and as such have different benefits and drawbacks.
The running example
Before we take a look at both approaches, let us introduce our running example: a simple calculator
The calculator has a well defined public interface with only one method:
public double calculate(final Expression calculationExpression);
The calculator gets a mathematical expression as input and returns the result of evaluating the expression.
The input represents a tree of operations. Each node is one of the supported operands: Plus, Minus, Multiply and Divide.
The leaves of the tree are numerical values. If you are familiar with interpreters, think of the calculator as a very simple
AST-Interpreter for arithmetic expressions.
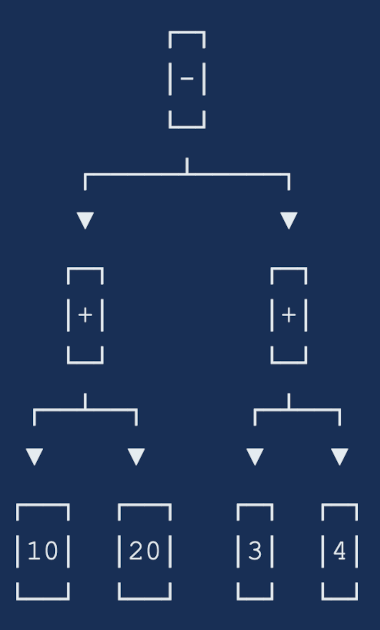
For example the expression (10+20)-(3+4) is represented as the Expression tree below and the calculate method should yield
the result 23.
Put in code, this calculation would look like this:
public class Main {
    public static void main(final String[] args) {

        final var calculator = new Calculator();

        final var minuend = new Plus(new Value(10d), new Value(20d));
        final var subtrahend = new Plus(new Value(3d), new Value(4d));

        final var calculationExpression = new Minus(minuend, subtrahend);

        final var result = calculator.calculate(calculationExpression);

        System.out.println(result);
    }
}
Implementation
Note: The implementation as discussed here, is intentionally more complex than necessary just as a means for us to highlight the differences between the fine grained and coarse grained units.
There are two central interfaces: Expression and ExpressionHandler. Each operator and the class used to represent values
implement the Expression interface. For each of these implementations there exists a corresponding implementation of the
ExpressionHandler interface that contains the evaluation logic for its Expression type.
The Expression interface:
public sealed interface Expression
    permits Plus, Minus, Multiply, Divide, Value {
}
The ExpressionHandler interface:
public sealed interface ExpressionHandler< T extends Expression >
    permits PlusHandler, MinusHandler, MultiplyHandler, DivideHandler, ValueHandler {

        double evaluate( Calculator calculator, T expression );
}
The Divide expression for example is a record with a dividend and divisor implementing the Expression interface.
public record Divide(Expression dividend, Expression divisor) implements Expression {
}
Accordingly, there is also a DivideHandler implementing the ExpressionHandler interface.
final class DivideHandler implements ExpressionHandler<Divide> {
    @Override
    public double evaluate(final Calculator calculator, final Divide expression) {

        final double divisor = calculator.calculate(expression.divisor());
        if (divisor == 0.0d) {
            throw new ArithmeticException("Division by zero");
        }

        return calculator.calculate(expression.dividend()) / divisor;
    }
}
As the operands of the Divide expression are themselves expressions, we simply utilize a Calculator instance to recursively
calculate the result of the operand expressions. Finally, the Divide handler performs the actual division.
All other operators follow the same pattern, so we won’t explain them in detail here.
But when come the numbers in play? Meaning, we probably need numbers to perform a calculation, right?
Here the Value expression comes to the rescue. It’s a constant expression and represents a single number.
public record Value(double value) implements Expression {}
The respective expression handler simply returns the value of the Value expression.
final class ValueHandler implements ExpressionHandler<Value> {
    @Override
    public double evaluate(final Calculator ignored, final Value expression) {

        return expression.value();
    }
}
As mentioned earlier, the leaves of the expression tree must be Value expressions in order for the mathematical expression to make sense.
Due to the nature of our base implementation, you can only provide an expression tree with Value expressions as its leaves. You can’t get it wrong.
Now, if the expression handlers do all the heavy lifting, what does the Calculator do exactly? Well, it picks the correct handler for the given expression and executes it!
public double calculate(final Expression calculationExpression) {

    final var expressionHandler = expressionHandlerProvider.provider(calculationExpression);
    return expressionHandler.evaluate(this, calculationExpression);
}
Now you might wonder where the expressionHandlerProvider comes from?
It just abstracts the creation and selection of the expression handler away.
So the calculator does not contain any logic.
It just needs to compose the resulting expression handler with the given expression correctly.
For all the curious people, here is the implementation of the ExpressionHandlerProvider:
public class ExpressionHandlerProvider {

    private static final DivideHandler DIVIDE_HANDLER = new DivideHandler();
    private static final PlusHandler PLUS_HANDLER = new PlusHandler();
    private static final MinusHandler MINUS_HANDLER = new MinusHandler();
    private static final MultiplyHandler MULTIPLY_HANDLER = new MultiplyHandler();
    private static final ValueHandler VALUE_HANDLER = new ValueHandler();

    public <T extends Expression> ExpressionHandler<T> provider(final T expression) {

        return switch(expression) {
            case Plus plus -> (ExpressionHandler<T>)PLUS_HANDLER;
            case Minus minus -> (ExpressionHandler<T>)MINUS_HANDLER;
            case Multiply multiply -> (ExpressionHandler<T>)MULTIPLY_HANDLER;
            case Divide divide -> (ExpressionHandler<T>)DIVIDE_HANDLER;
            case Value value -> (ExpressionHandler<T>)VALUE_HANDLER;
            default -> throw new IllegalArgumentException("Unknown expression: " + expression.getClass());
        };
    }
}
As the handlers are stateless, the factory uses constants for the expression handlers.
It simply returns the correct handler instance for the given expression.
One last hint, please don’t use this calculator anywhere. It is just built for testing purpose and not suitable for production use!
You can find code from the example here: https://github.com/sebastiankonieczek/CalculatorDemoProject
Now, let’s dive into the first approach of testing this library.
The Fine Grained Style
To follow along, you can checkout the branch “fine-grained-testing” in the repository linked above for the full test implementation.
To follow the fine grained testing style we need to test every single class separately. Let’s start with the easy ones.
We mentioned that every Expression has an equivalent ExpressionHandler implementation.
So we need to test these implementations separately.
The interface of the PlusHandler expression for example looks like this:
public double evaluate(final Calculator calculator, final Plus expression)
As we can see, we have two inputs, the calculator and the Plus expression. We know that the plus expression itself consists of two child expressions. One expression for the augend and one that represents the addend.
Now, to get the final value of the augend and the addend. We determine that we will use the calculator to calculate the result of these expressions.
We also determine that the plus handler will add the result of the augend expression to the result of the addend expression and return the result of this addition.
With this in mind, we can start to implement the tests for the plus handler. Lets have a look at the final test code and go through it step by step:
class PlusHandlerTest {
    ➀private final PlusHandler plusHandler = new PlusHandler();
    private Calculator calculator;

    @BeforeEach
    void setUp() {
        ➁calculator = mock(Calculator.class);
    }

    ➂@ParameterizedTest
    @CsvSource({
            "2,3,5",
            "-3,1,-2",
            "-3,3,0",
            "-3,0,-3"})
    void test(final Double augend, final Double addend, final Double expectedResult) {

        ➃final var augendExpression = mock(Expression.class);
        final var addendExpression = mock(Expression.class);

        ➄when(calculator.calculate(augendExpression)).thenReturn(augend);
        when(calculator.calculate(addendExpression)).thenReturn(addend);

        ➅final var plusExpression = new Plus(augendExpression, addendExpression);
        final var result = plusHandler.evaluate(calculator, plusExpression);

        ➆assertThat(result).isCloseTo(expectedResult, Offset.offset(.1));
    }
}
➀ - Our testee is the PlusHandler so we create an instance of the plus handler as a field variable. The first input of the plus handler is the calculator, we define it as a field variable as well.
➁ - We initialize the calculator to a mock instance in the set up method of the test as want to avoid accidentally testing the behaviour of the calculator class.
➂ - To test the behaviour of the plus handler we use a parameterised test with a csv source. The arguments of the test are the augend, the addend and the expected result of the additions.,
➃ - In the test method itself we at first create mock objects for the augend and the addend expression. We do this to make clear that we do not care about the specific type of the expression. We only care about the result of the calculator call for the respective expressions.
➄ - When the calculator is called with the augend expression, we want to return the augend parameter of the test. We do the same for the addend expression.
➅ - We create a plus expression with our mocked augend and addend expression and call the plus handlers evaluate method with the just created plus expression and our calculator mock object.
➆ - Finally we assert that the result of the plus handler call is close to the expected result parameter of the test. We do this as we calculate with doubles here. Although we have only whole numbers as test parameters and it is thus not necessary so far, you can consider this a premature optimization in case we want to extend out test cases with fractional numbers.
Our test for the plus handler is now complete! As you can see, we have a very specific test. It only tests exactly the logic of the plus handler implementation. All collaborators the handler acts with are replaced with mock objects to have a clear focus on the plus handlers functionality. It also helps us understand, that the type of expression, the augend and addend expression is of, does not have an impact on the plus handlers behaviour.
This approach has at least one major downside, as the attentive reader might have noticed. We need to be able to create mock objects of the Expression interface. So we need to unseal the interface. This makes the public interface of the calculator library a little bit less clear.
All other handler tests follow the same pattern, so we won’t go through them in detail.
Next, let us focus on the Calculator class itself.
Again, let us at first look at the interface of the calculator.
public double calculate(final Expression calculationExpression)
The calculate method has one input, the expression to be calculated. Furthermore, the Calculator has one collaborator, the
expression handler factory.
For the calculator we determine, that the calculator utilizes the expression handler factory to provide an expression handler suitable for the given expression. Furthermore, we determine that the calculator uses the resulting expression handler to evaluate the result of the given expression. The calculator finally returns the result returned from the expression handler.
With these facts at hand, we can implement a respective test. Again, here is the final test implementation, we will go through it step by step in a minute:
class CalculatorTest {
    ➀private Calculator calculator;
    private ExpressionHandlerProvider expressionHandlerProvider;

    @BeforeEach
    void setUp() {

        ➁expressionHandlerProvider = mock(ExpressionHandlerProvider.class);
        calculator = new Calculator(expressionHandlerProvider);
    }

    @Test
    void test_calculator_evaluates_the_given_expression_on_the_respective_expression_handler() {

        ➂final var expectedResult = 1.2d;

        ➃final var expressionHandler = mock(ExpressionHandler.class);
        final var calculationExpression = mock(Expression.class);

        ➄when(expressionHandlerProvider.provider(calculationExpression))
            .thenReturn(expressionHandler);
        when(expressionHandler.evaluate(calculator, calculationExpression))
            .thenReturn(expectedResult);

        ➅final var result = calculator.calculate(calculationExpression);

        ➆assertThat(result).isEqualTo(expectedResult);
    }
}
At first, you might notice that there is only one test for the calculator (side note: There should of course be some null tests,
but we omitted those for brevity and to focus on points we want to emphasize). Because we tested all the other collaborators of
the library separately, we do not need to test these again. Thus, as the calculator only glues our collaborators together.
We only need to test if this composition is done the right way.
➀ - We declare the calculator and the expression handler provider as filed variables.
➁ - In the set-up code for the test, we assign a mock object to the expression handler provider and initialize the calculator with this expression handler provider mock. Again, we do not want to test how the expression handler behaves. We just need it to provide us with an expression handler that we have under control.
➂ - In the test, we initialize the expected result to the more or less random value 1d.
➃ - We create a mock object for the expression handler and the expression that serves as input for the calculator. This is because we are not interested in a specific expression handler nor expression. We just want to make sure, that the calculator returns the evaluated result of the given expression regardless of the expression type and the expression handler type.
➄ - We define that we want the expression handler provider to return our expression handler mock when it is called with our input calculation expression. Furthermore, we define that our expression handler mock object returns the expected result when called with our input expression.
➅ - Now everything for the test is set up and we can call the calculator with our input calculation expression.
➆ - At the end we assert that the result of the calculator must be the expected result.
As with the plus handler test, this test as well mocks all collaborators away. It focuses solely on the behaviour of the calculator. It also makes clear, that for the calculator, the concrete types of expression, expression handler and expression handler provider are not relevant to execute its logic.
But we also need to open up our api a bit to be able to mock all collaborators. We sadly have to unseal the ExpressionHandler interface as sealed interfaces cannot be mocked. We also cannot make the expression handler provider a final class.
But more on the benefits and downsides of this approach later.
There is one last class to test. The expression handler provider. This test is pretty straight forward and does nearly need no mock objects. This time the concrete types matter as these define the inner logic of the provider.
Let us look at the implementation of this test:
class ExpressionHandlerProviderTest {
    private final ExpressionHandlerProvider expressionHandlerProvider =
        new ExpressionHandlerProvider();

    public static Stream<Arguments> expressionHandlerFactoryTestData() {

        return Stream.of(
            Arguments.of(new Plus(v(), v()), PlusHandler.class),
            Arguments.of(new Minus(v(), v()), MinusHandler.class),
            Arguments.of(new Multiply(v(), v()), MultiplyHandler.class),
            Arguments.of(new Divide(v(), v()), DivideHandler.class),
            Arguments.of(v(), ValueHandler.class));
    }

    private static Value v() {
        return new Value(0);
    }

    ➀@ParameterizedTest
    @MethodSource("expressionHandlerFactoryTestData")
    <T extends Expression> void test(
        final T expression, final Class<ExpressionHandler<T>> expressionHandlerClass) {

        final var expressionHandler = expressionHandlerProvider.provider(expression);
        assertThat(expressionHandler).isInstanceOf(expressionHandlerClass);
    }

    ➁@Test
    void test_throws_exception_on_unknown_expression() {

        final Expression expression = mock(Expression.class);
        assertThatThrownBy(() -> expressionHandlerProvider.provider(expression))
            .isInstanceOf(IllegalArgumentException.class);
    }
}
We have two tests here.
➀ - One test is a parametrized test. It tests if the provider provides handlers of the correct type for each known expression type.
➁ - The second test tests that there is an illegal argument exception thrown if an unknown expression type is used to get an expression handler.
Now let us go on with the coarse grained style.
The coarse grained style
We named this approach to defining units coarse grained style, because we try to build larger units which we will test. As seen in the previous section a unit can be anything from a function/method to a class.
In this case we try to find groups of cohesive objects (that can, but don’t have to span more than one class) that provide some behaviour and test that group as a unit through its public interface. We treat the unit more as a black box, in particular with regard to its internal structure.
This style focuses more on the inputs and outputs of the system, hence the parallels to the classicist TDD style. Test doubles are applied where external collaborators are needed, e.g. repositories, other modules, etc. Here interaction verification can also be used to check the interactions between the objects.
Returning to our running example, there we would consider the whole calculator module as a unit. The module is tested via its
public interface, in this case composed of the calculate method and the implementations of the Expression interface.
The implementation itself is opaque from the perspective of the tests. The tests require no, or only very little knowledge about
implementation details.
How would the tests for our calculator look like?
class TestCalculator {

    private static final double OFFSET = 0.1;

    private final Calculator calculator = new Calculator(new ExpressionHandlerFactory());

    public static Stream<Arguments> source() {
        return Stream.of(
            Arguments.of(new Plus(v(2d), v(3d)), 5d),
            Arguments.of(new Plus(v(-3d), v(1d)), -2d),
            Arguments.of(new Plus(v(-3d), v(3d)), 0d),
            Arguments.of(new Plus(v(-3d), v(0d)), -3d),

            Arguments.of(new Minus(v(2d), v(3d)), -1d),
            Arguments.of(new Minus(v(7.1), v(3d)), 4.1),
            Arguments.of(new Minus(v(-2d), v(-3d)), 1d),
            Arguments.of(new Minus(v(-3d), v(0d)), -3d),

            Arguments.of(new Multiply(v(2d), v(3d)), 6d),
            Arguments.of(new Multiply(v(7.1), v(3d)), 21.3),
            Arguments.of(new Multiply(v(0d), v(-3d)), 0d),
            Arguments.of(new Multiply(v(-2d), v(1d)), -2d),

            Arguments.of(new Divide(v(6d), v(3d)), 2d),
            Arguments.of(new Divide(v(7.1), v(1d)), 7.1),
            Arguments.of(new Divide(v(0d), v(-3d)), 0d),
            Arguments.of(new Divide(v(-4d), v(2d)), -2d),

            Arguments.of(
                new Minus(
                    new Plus(
                        v(2),
                        new Multiply(v(-3), v(-3.3))),
                    new Divide(v(7.1d), v(2d))), 8.3d));
    }

    @ParameterizedTest
    @MethodSource("source")
    void testSimpleAddition(final Expression expression, final double expectedResult) {

        assertThat(calculator.calculate(expression)).isCloseTo(expectedResult, Offset.offset(OFFSET));
    }

    @Test
    void testDivisionByZero() {

        assertThatThrownBy(() -> calculator.calculate(new Divide(v(1), v(0))))
            .isInstanceOf(ArithmeticException.class)
            .hasMessage("Division by zero");
    }

    private static Value v(final double v) {

        return new Value(v);
    }
}
In this case we have a module without any external dependencies that represents a function. The module is a computation that, given an input, will produce an output without any side effects. So there is no need for any test doubles.
The test cases represent different variations of possible inputs. Of course not exhaustive but expressions could be arbitrarily complex in order to cover different edge cases. Most test cases use a parametrised test as they follow the same pattern. There is also an explicit test for the division by zero which is one of the edge cases of the calculator.
Testing via the public interface has the benefit, that the tests are agnostic of the implementation approach chosen. They only validate the observable behaviour of the component. If we were to choose a different class structure or a completely different implementation pattern, our tests would not be affected by that, as long as the public interface of the module does not change.
It is not the case in our example. But this coarse grained style does not conflict with interaction based testing, i.e. validation interactions between collaborators. Only that those collaborators are external to the module under test.
Think for instance of a module that retrieves and/or stores data from an external datastore. That datastore could still be provided by a test double. On that test double interactions could be validated, if needed, or it could simply provide prepared data for the test. At the same time which classes exactly would interact with the external collaborator of the module is not constrained by the test.
Pros and Cons of each approach
The fine grained style:
Pros:
The fine grained style helps you to keep focus on the exact behaviour of a class under test. It also helps you to find the right level of abstraction and class design. When you realize you need to handle a lot of boiler plate code to test a certain class or function, it is most likely a hint that your level of abstraction or class design is not sufficient.
Because of the focus, the fine grained style can help keeping test code small and straight forward and therefore easier to understand. Also, it can help to understand the interaction of collaborators on a class level as those are replaced by mocks and their behavior in a test is clearly defined.
As test code and implementations are more tightly coupled, changes in the implementations are immediately reflected in the tests. This makes it more unlikely to produce implementation errors.
Cons:
To be able to mock all collaborators, you might be forced to open up your api more than you want. For example unsealing interfaces or making class non final. You also might be tempted to add some test only code with a lower visibility level that lets you keep your api closed but allows you to test. This poisons your production code and should only be considered in very rare cases.
The fine grained style also makes you a little less flexible as the tests and the implementations are more tightly coupled. This makes changes in test code more likely, when an implementation detail changes.
The fine grained style produces a lot of test classes. This can make it harder to understand the connections of the single classes and the functionality of the public api.
The coarse grained style:
Pros:
The coarse grained style helps you to define a clear and well defined public interface to your business code as it focuses a lot on the public interface. For example, requiring a lot of boilerplate code to parametrize your test can be a hint of a poor interface design.
This approach is also helpful with regard to information hiding. It allows the implementation to only expose as little as possible of its internal structure that are inherently necessary to perform the business task.
The coarse grained approach allows for easier refactoring of implementation details as long as these refactorings should not affect the public interface. The tests only interact through the public interface with the classes under test. Hence they should provide a safety net for the refactoring.
Cons:
The benefit of being agnostic of the implementation details under test, can also be a downside. It gives less detailed feedback on the quality of the internal design of a module. Although it is good, that the coarse grained style is agnostic of the implementation details, it can lead to poor class and implementation design. This is because it focuses more on the public interface and the inputs and outputs of the system.
When a lot of external collaborators come into play while using the coarse grained style, setting up the testcases and mocking all collaborators can get complex and confusing very fast. This makes it harder to understand certain testcases. The same holds true for complex input structures or a combination of both.
Conclusion
In this article we contrasted two approaches to defining units of abstraction in your code and tests. Which one should you use in the end? As many things in this profession, the answer is, it depends.
If you know how to tackle a specific problem and the interface is quite clear, going for a coarse approach might be the sensible choice. If you are trying to find the components to solve a problem or to understand a certain algorithm, it might be wise to go fine grained to guide the discovery.
Another thing to consider is which test to write vs. which test to keep. While implementing a component it might be helpful to test at a finer level of granularity. Once the implementation is settled, it might be reasonable to only keep a subset of these tests. Preferably tests that do not rely on the implementation details but ensure the behaviour and help guard the assumptions and decisions taken when the component or feature was originally implemented.
In the end, there are many things to consider. So probably a combination of both approaches can lead you to a good and reliable testing strategy.
Pick whichever approach suits you best for your current problem! After all this discussion, the most important point to make is: testing (at different levels) is a central practice in software development. In particular testing as part of the design process is a helpful practice to create testable and maintainable software. We hope the discussion and examples in this article were interesting to read and … let us know …
Acknowledgements: we would like to thank Jens Knipper, Jorge Acetozi and Roy Wasse for their valuable feedback while writing this article.
View the original post at: foojay.io