
Communicating our APIs: Three methodologies of API Development
This blog post is the Part 2 of the “Communication our APIs” series. In the first part, we’ve explored standardized API specifications such as OpenAPI, AsyncAPI and how they can be utilized to automatically generate consumer friendly API Docs as web pages. If you haven’t had a chance to read it yet, I highly recommend starting with Part 1, to fully grasp the context of this part.
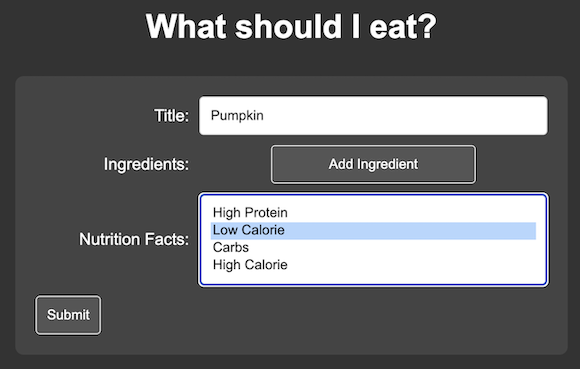
Code First, API First, Consumer First are three processes in API development. In this blog post we will implement a Recipes API and a Client based on Code First, API First and Consumer First methodologies and analyze how each approach impacts the interactions between a fictional provider and consumer. Additionally, we will go through some additional use-cases where we can mix-and-match these three methodologies. During this part we will uncover the capabilities around OpenAPI Specification, the power of OpenAPI Generator and Pact Contract testing to improve provider and consumer experience. The examples given in this blog post are available on Github and can be found on respective sections where they are described.

Code First APIs
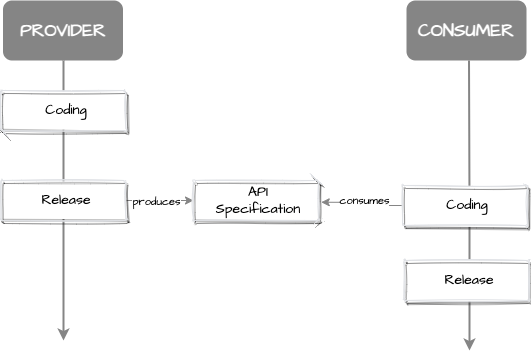
“Code first” is the process of communicating API specification once coding has been done. With this methodology the API provider initially focuses on coding and has more flexibility to change the design along the way. The disadvantage of this approach is late communication, as consumers get the new specification only after API changes have been released, therefore it does not enable consumers to start development in parallel. The provider might put additional code to enrich the specification with more contextual information (i.e. annotations). This is another drawback, as the code may be inflated with the lines that don’t belong to the business logic.
Code first example with Spring Boot
Springdoc provides a library for generating OpenAPI 3 specification for Spring Boot Web applications. It has support for Spring MVC and Spring WebFlux. The following example shows how to enable OpenAPI 3 Specification of a Spring MVC application with a couple of steps.
Given a Spring Boot 3.x MVC Web application, the application auto-generates specification by only adding springdoc-openapi-starter-webmvc-ui dependency to Gradle (or Maven). Specification is served together with the running application as an endpoint.
- OpenAPI Specification:
http://server:port/v3/api-docs - Swagger-UI:
http://server:port/swagger-ui.html
With the help of org.springdoc.openapi-gradle-plugin or springdoc-openapi-maven-plugin, it is also possible to generate the specification file without running the application if the provider prefers to publish it as an artifact or even use it for documentation generation.
So far we have minimal path and schema definitions which are generated by Springdoc based on detected Rest Controller classes. However, it can be enriched further with a couple of OpenAPI annotations. The full example is available on GitHub.
@SpringBootApplication
@OpenAPIDefinition(info = @Info(title = "Recipes API - Code First API spec example")
public class CodeFirstApiApplication { ... }
...
@RestController
@Tag(name = "Recipes API")
public class RecipeController {
  ...
  @GetMapping("/recipes")
  @Operation(summary = "List all recipes")
  public List<Recipe> findRecipes(
    @RequestParam Optional<String> title,
    @RequestParam Optional<List<String>> ingredients,
    @RequestParam Optional<List<Recipe.NutritionFact>> nutritionFacts) {
    // Business logic here
  }
  ...
}
...
public record Recipe(
  @Schema(description = "Title of the recipe", example = "Chilli sin Carne") String title,
  @Schema(description = "List of ingredients") List<Ingredient> ingredients,
...
}
- @OpenAPIDefinition: Defines the info metadata of the specification
- @Operation: Describes and operation (typically HTTP Method) and its attributes
- @Schema: Defines input or output data, fields and its attributes such as description, example
More information about the annotations can be found here.
API First
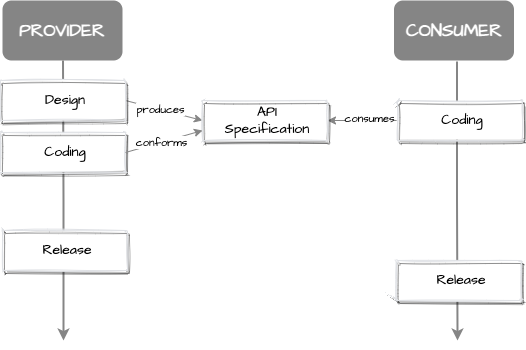
API First is also known as Contract First. It is the approach that follows the process of implementing OpenAPI Specification before coding. The process prioritizes API design over implementation and enables early communication with the consumer. The provider writes the specification as a yaml (or json) document with the help of a GUI Editor such as Swagger Editor or simply by using a convenient plugin on the IDE. OpenAPI.Tools provides a comprehensive list of open source and paid OpenAPI GUI editors. Documentation is another fundamental part of API First approach and usually thought ahead.
Once the result specification is published (as documentation and artifact), coding will follow. Contract First API development enables providers and consumers to implement server and client code in parallel. A slight disadvantage for the providers is lack of flexibility when it comes to changing the API design. Especially during early phases of building a new service, the Contract First development lifecycle may rather feel a bureaucratic process, when design keeps changing. In such situations it may be helpful to focus on coding, and introduce the API First development process at a later point of time when the API becomes stable.
Code Generation
OpenAPI Generator is an open-source project which provides code generators to build API client, server and documentation from OpenAPI Specifications. It has a wide support of generators for many programming languages and frameworks. The providers and consumers might use a CLI or build tool plugins to generate server or client code. This would speed up the coding process and improve the coding experience.
Generating Spring Boot Service
OpenAPI Generator provides Spring support. The following example showcases a controller implementation generated with the help of org.openapi.generator Gradle Plugin on a Spring Boot 3.x MVC Web application. The full example is available on GitHub.
openApiGenerate {
    generatorName = "spring"
    inputSpec = "$rootDir/api/src/main/resources/recipes-api.yaml"
    outputDir = "$buildDir/generated"
    apiPackage = "com.enisspahi.example.api.controller"
    invokerPackage = "com.enisspahi.example.api"
    modelPackage = "com.enisspahi.example.api.model"
    configOptions = [
            library: "spring-boot",
            delegatePattern: "true",
            documentationProvider: "none",
            useSpringBoot3: "true"
            ***
    ]
}
- generatorName: Defines
springas generator - inputSpec: Specifies the OpenAPI Specification
- Package structure is customized with options such as apiPackage, invokerPackage, modelPackage
- configOptions: Spring specific generator options to customize various aspects of code generation such as library, spring boot version, annotations on generated code, etc. Some of the interesting ones are
- delegatePattern: Highly recommended
trueoption to generate controller implementation using delegate pattern. - documentationProvider: To generate and serve OpenAPI Specification together with the running application as an endpoint. The specification is built from the generated code, therefore it may diverge from the initial specification, therefore
noneis used in the example. - reactive:
truefor Spring Boot WebFlux (Reactive) Application support - The full list of options can be found here.
- delegatePattern: Highly recommended
Once the Gradle openApiGenerate task is triggered relevant Rest Controllers, request and response classes will be generated. Now it’s time to implement the RecipesApiDelegate interface.
@Component
public class RecipeController implements RecipesApiDelegate {
    ...
    @Override
    public ResponseEntity<List<Recipe>> findRecipes(Optional<String> title, Optional<List<String>> ingredients, Optional<List<String>> nutritionFacts) {
        // Business logic here
        return new ResponseEntity<>(responseBody, HttpStatus.OK);
    }
    ...
}
- RecipeController implements the RecipeApiDelegate which is a delegate interface that will be called by the generated Rest Controller. Not implemented endpoints will result with HTTP Status 501 (Not Implemented) for any call.
Generating Java Client
OpenAPI Generator can be used for client side code generation as well. The following example showcases a client implementation used in Web Based UI Client. The full example is available on GitHub.
openApiGenerate {
    generatorName = "java"
    inputSpec = "$rootDir/api/src/main/resources/recipes-api.yaml"
    outputDir = "$buildDir/generated"
    apiPackage = "com.enisspahi.example.api"
    invokerPackage = "com.enisspahi.example.api.invoker"
    modelPackage = "com.enisspahi.example.api.model"
    configOptions = [
            library: "native",
            dateLibrary: "java8",
            useJakartaEe: "true",
            openApiNullable: "false",
    ]
}
- generatorName: Defines
javaas generator - inputSpec: Specifies the OpenAPI Specification
- Package structure is customized with options such as apiPackage, invokerPackage, modelPackage
- configOptions: Java specific generator options
- library:
nativeconfigures native Java API client. Other libraries like OkHttp, Feign, Spring’s Webclient and RestTemplate are other options based on preference. - The full list of options can be found here.
- library:
Once the Gradle openApiGenerate task is triggered relevant API Client, request and response classes will be generated. Now it’s time to implement an API Call.
var client = new ApiClient();
client.setHost("localhost");
client.setPort(8080);
var recipesApi = new RecipesApiApi(client);
var response = recipesApi.findRecipes(title, ingredients, nutritionFacts);
- RestApiApi Is the generated client stub.
- APIClient Is an optional constructor argument to RestApiApi to customize host and port configuration. If not provided, the API will rely on the default server url of the consumed Open API Specification.
Contract Validation
Some developers might prefer not to use code generators instead implement API (or client) by themselves. This might be the choice due to various reasons (i.e. reduce boilerplate code, smaller scope, lack of framework support, etc). In that case there is a risk that API implementation diverging from the specification. Therefore it is recommended to perform some contract testing to enforce the implementation against the contract.
Swagger Request Validator
One of the ways to achieve contract validation is using swagger-request-validator library which can validate request/responses against OpenAPI Specification. The following example shows a REST Assured test example which validates that API behavior conforms to the specification.
private final OpenApiValidationFilter validationFilter = new OpenApiValidationFilter("https://github.com/enisspahi/contract-first-api-example/blob/main/api/src/main/resources/recipes-api.yaml");

@Test
public void recipesEndpointConformsSpecification() {
   given()
      .filter(validationFilter)
      .when()
      .get("/recipes")
      .then()
      .assertThat()
      .statusCode(200);
}
- OpenApiValidationFilter: Additional Rest Assured filter to apply OpenAPI validation
- recipesEndpointConformsSpecification: Unit test would fail if it encounters an HTTP status code or a response field which is not present in the specification.
More examples with different REST Clients or testing libraries can be found here.
Consumer First API Development
Code first and API first are fundamentally provider driven. Provider defines the API endpoints and the exchanged request and response formats and communicates them to the consumer. However, API specifications may not provide sufficient details on API behavior or business logic.
In our fictional use case it is the consumer who is hungry and has some expectations from the Recipes API. What if Consumer would communicate the expected API behavior to the provider? Pact is a code-first consumer contract testing that fulfills exactly this need.
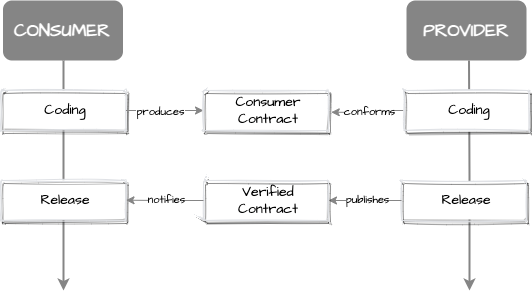
This is how Pact can be utilized to follow a Consumer Driven API development process:
- The consumer implements the expected behavior in a form of Consumer Contract Test
- Once executed the test generates the consumer contract as Pact file
- Consumer publishes generated the pact to a middleware called Pact Broker
- The provider verifies its API implementation against the pact in a form of Provider Contract Test. If not matched, tests will fail.
- Provider deploys the API and performs a final verification and publishes the result
- Consumer performs a “can I deploy?” check and is ready to go with releasing its client application.
Let’s see the example step by step. As the first step, clone the GitHub repository.
Running Pact Broker
The following docker compose will start the Pact Broker and a required Postgres database. Once the docker container starts, the broker should be running on http://localhost:9292/.
docker compose -f .docker/docker-compose.yml up -d
Consumer Side
Required dependencies and build tool setup:
plugins {
    ...
    id "au.com.dius.pact" version "latest version"
}

dependencies {
    ...
    testImplementation 'au.com.dius.pact.consumer:junit5:latest version'
    ...
}

pact {
    publish {
        pactBrokerUrl = "http://localhost:9292/"
    }

    broker {
        pactBrokerUrl = "http://localhost:9292/"
    }
}
Pact Consumer Test implementation:
@PactConsumerTest
@PactTestFor(providerName = ConsumerContractTests.RECIPES_PROVIDER, pactVersion = PactSpecVersion.V3)
public class ConsumerContractTests {

    static final String RECIPES_PROVIDER = "RecipesAPI";
    static final String RECIPES_CONSUMER = "RecipesClient";

    @Pact(provider = RECIPES_PROVIDER, consumer = RECIPES_CONSUMER)
    public RequestResponsePact getAllRecipesPact(PactDslWithProvider builder) {
        return builder
                .uponReceiving("GET all recipes")
                    .path("/recipes")
                    .method("GET")
                .willRespondWith()
                    .status(200)
                    .body(recipesResponseStructure(Optional.empty(), Optional.empty()))
                .toPact();
    }

    @Test
    @PactTestFor(pactMethod = "getAllRecipesPact")
    void getsAllRecipes(MockServer mockServer) throws IOException {
        var httpResponse = Request.get(mockServer.getUrl() + "/recipes")
                .execute()
                .returnResponse();
        assertEquals(200, httpResponse.getCode());
    }

}
- @PactConsumerTest: The JUnit 5 extension that takes care of hooks
- @PactTestFor: Defines 2 sides of the contract
- provider: The identifier for the API Provider
- consumer: The identifier for the API Consumer
- @Pact: Defines the interactions between consumer and provider. recipesResponseStructure provides the expected response type and necessary matchers. The full version can be found on the GitHub repo.
- @PactTestFor: References the pact and is added to the test method. It will ensure the the test will have a mocked API for triggering the interaction.
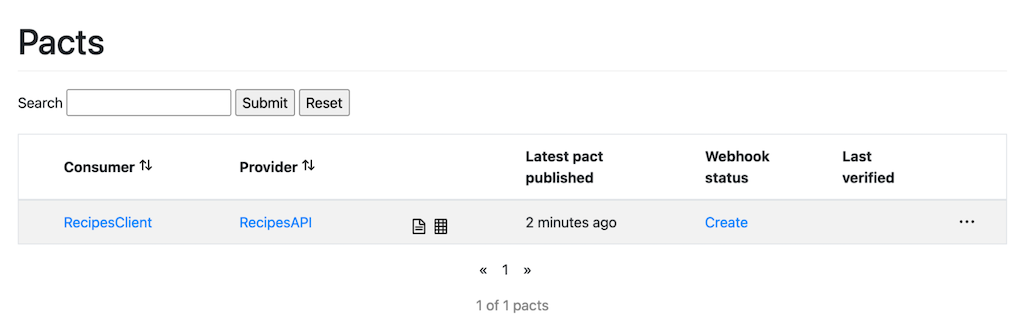
Once the test passes the consumer can decide to publish the generated pact to the Pact Boker via ./gradlew :client:pactPublish command. By now the pact will be visible on the broker. However, it has not been verified yet. The provider still has some work to do.
Provider Side
Required dependencies and build tool setup:
plugins {
    id "au.com.dius.pact" version "latest version"
}
dependencies {
    testImplementation 'au.com.dius.pact.provider:junit5spring:latest version'
}
pact {
    serviceProviders {
        RecipesAPI {
            host = 'localhost'
            port = "8080"
            hasPactWith('RecipesClient') { }
        }
    }
    broker {
        pactBrokerUrl = "http://localhost:9292/"
    }
}
Applying Pact provider verification to a Spring Boot MVC project is quite straight forward.
@ExtendWith(SpringExtension.class)
@SpringBootTest(webEnvironment = SpringBootTest.WebEnvironment.RANDOM_PORT)
@Provider("RecipesAPI")
@PactBroker(url = "http://localhost:9292/")
class ProviderContractTests {

    @TestTemplate
    @ExtendWith(PactVerificationSpringProvider.class)
    void pactVerificationTestTemplate(PactVerificationContext context) {
        context.verifyInteraction();
    }

}
- @Provider: References the API provider name. This value should match a real pact provider name on the Pact broker.
- @PactBroker: Configures the connection to the Pact Broker to download the pact file files during test execution
- @TestTemplate and PactVerificationSpringProvider extension will ensure all pact interactions are tested. Here there is no mocking, it verified the pacts against a running Spring Boot application.
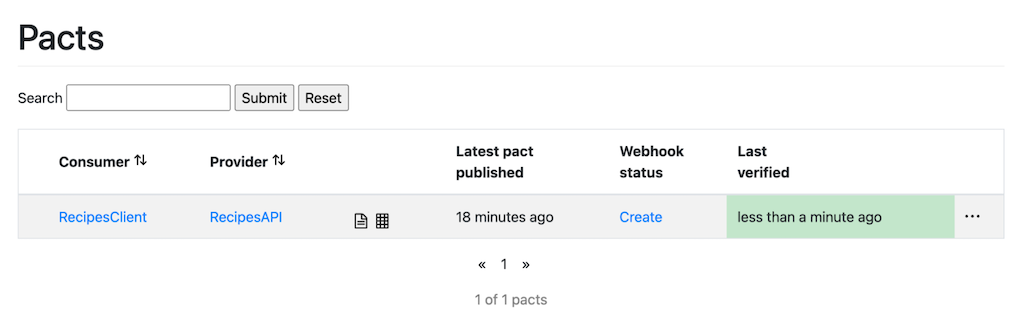
Once API implementation is finished and verifications are successful we are ready to deploy the API. In this phase the Provider is ready to deploy the API and trigger the following command to perform a final verification and publish the result to the Pact Broker.
./gradlew :service:pactVerify -Dpact.verifier.publishResults=true
The state on the Pact Broker will look as verified. The pact is achieved.
Final step: Consumer rollout
Now that API has fulfilled consumers expectations and the pact has been achieved. The Consumer can roll out its client. A final check should be done before proceeding. Pact provides a “Can I deploy?” feature. Which can be achieved with the following command.
./gradlew :client:canIDeploy -Ppacticipant='RecipesClient' -Platest=true
The result will look successful, meaning a pact has been achieved and the consumer can deploy the client.
> Task :client:canIDeploy
Computer says yes \o/

All required verification results are published and successful
VERIFICATION RESULTS
--------------------
1. http://localhost:9292/pacts/provider/RecipesAPI/consumer/RecipesClient/pact-version/fb1215ad994f3660ffdc2cc723878262f06faa54/metadata/Y3ZuPTAuMC4xLVNOQVBTSE9U/verification-results/203

BUILD SUCCESSFUL
The given example is very simplistic. Pact provides more than that. For instance, pacts can be versioned, and have separate verifications on multiple stages. More features to be explored on Pact Broker.
Documentation with Pact
The Pact Broker has out of the box documentation on published Pacts. Pact documentation can be viewed by choosing “view pact” option on listed pacts.
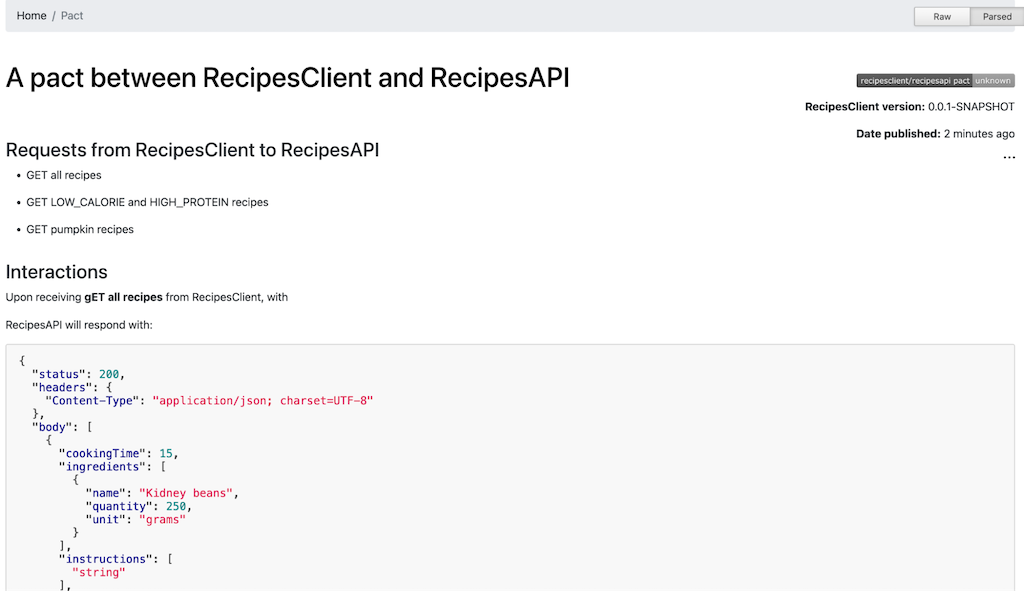
Consumer contract published to Pact Broker
Combining API first and Consumer first
We’ve seen that API first methodology has benefits such as code generation (with Open API Generator) to speed up the development process, as well as numerous ways of documentation. Whereas, the Consumer first approach we can benefit from Pacts to match the consumer expectations with the provider when implementing APIs.
While both methodologies may sound contradicting due to one being provider driven, the other being consumer driven, there are practical ways to mix-and-match and benefit from both of them. With the help of swagger-request-validator-pact library, we can achieve this.
Swagger Request Validator Pact Example
swagger-request-validator-pact validates OpenAPI against Pact Consumer Contracts.
Required dependencies and build tool setup:
dependencies {
    testImplementation 'au.com.dius.pact.consumer:junit5:${pactVersion}'
    testImplementation 'com.atlassian.oai:swagger-request-validator-pact:${srvVersion}'
}
Updated consumer contract test implementation would look as follows.
@PactConsumerTest
@PactTestFor(providerName = ConsumerContractTestsWithSpecValidation.RECIPES_PROVIDER, pactVersion = PactSpecVersion.V3)
public class ConsumerContractTestsWithSpecValidation {

    static final String RECIPES_PROVIDER = "RecipesAPI";
    static final String RECIPES_CONSUMER = "RecipesClient";

    private final OpenApiInteractionValidator openApiInteractionValidator = OpenApiInteractionValidator.createForSpecificationUrl("https://raw.githubusercontent.com/enisspahi/contract-first-api-example/main/api/src/main/resources/recipes-api.yaml")
            .build();

    @Pact(provider = RECIPES_PROVIDER, consumer = RECIPES_CONSUMER)
    public RequestResponsePact getRecipesByNutritionPact(PactDslWithProvider builder) {
        var pact = builder
                .uponReceiving("GET LOW_CALORIE and HIGH_PROTEIN recipes")
                    .path("/recipes")
                    .query("nutritionFacts=LOW_CALORIE&nutritionFacts=HIGH_PROTEIN")
                    .method("GET")
                .willRespondWith()
                    .status(200)
                    .body(recipesResponseStructure(Optional.empty(), Optional.of(Set.of("LOW_CALORIE", "HIGH_PROTEIN"))))
                .toPact();
        validate(pact);
        return pact;
    }

    @Test
    @PactTestFor(pactMethod = "getRecipesByNutritionPact")
    void getsRecipesByNutrition(MockServer mockServer) throws IOException {
        var httpResponse = Request.get(mockServer.getUrl() + "/recipes?nutritionFacts=LOW_CALORIE&nutritionFacts=HIGH_PROTEIN")
                .execute()
                .returnResponse();
        assertEquals(200, httpResponse.getCode());
    }

    private void validate(RequestResponsePact pact) {
        pact.getInteractions().forEach(interaction -> {
            var result = openApiInteractionValidator.validate(PactRequest.of(interaction.asSynchronousRequestResponse().getRequest()), PactResponse.of(interaction.asSynchronousRequestResponse().getResponse()));
            if (result.hasErrors()) {
                throw new ValidatedPactProviderRule.PactValidationError(result);
            }
        });
    }
}
- OpenApiInteractionValidator: Reads the OpenAPI specification from the given URL.
- validate(pact): Verifies the generated pact against the specification.
With the implementation above each test will validate the generated pact against OpenAPI Specification., For instance, LOW_CALORIE, HIGH_CALORIE, HIGH_PROTEIN, CARBS are valid nutritionFact values as per OpenAPI Specification. In case a consumer wants to add a HIGH_ALCOHOL option, the validation will fail and pact generation won’t be successful.
Now that we are able to combine API first and Consumer first methodologies, we can benefit from both approaches to complement provider and consumer expectations.
Which methodology is the right one for me?
We’ve seen Code first, API first, Consumer first or even found ways to combine them. While “Code First” focuses on the development speed on the provider side, Contract First API development focuses on design, documentation and early communication to the consumer. On the other hand, Consumer first is about the consumer driving the process and defining the expectations from a provider. All methodologies have benefits, however the choice depends on the focus.
When to use Code first?
- Provider initially focuses on coding speed
- Provider needs flexibility to change the design often
- Consumer utilizes client code generation
- On internal APIs provided within the same organization
When to use API first?
- API design is prioritized over implementation
- Provider focuses on early communication with the consumer
- Provider generates and publishes API Documentation
- Provider and Consumer utilizes client code generation
- On public or partner facing APIs with large number of consumers
When to use Consumer first?
- Provider matches consumer needs during API development
- API consumer and provider test their applications independently
- To reduce the overhead while syncing API and consumer rollout
- On small number of consumers
When to combine API first and Consumer first?
- When API first alone is not sufficient to match consumer needs
Communicating our APIs Blog series
- Communicating our APIs: Specifications and Documentation
- Communicating our APIs: Three methodologies of API Development
Reference & Credits
- https://swagger.io/specification/
- https://openapi.tools/
- https://openapi-generator.tech/
- https://docs.pact.io/
- https://bitbucket.org/atlassian/swagger-request-validator/src/master/
- https://docs.spring.io/spring-framework/reference/web/webmvc.html
